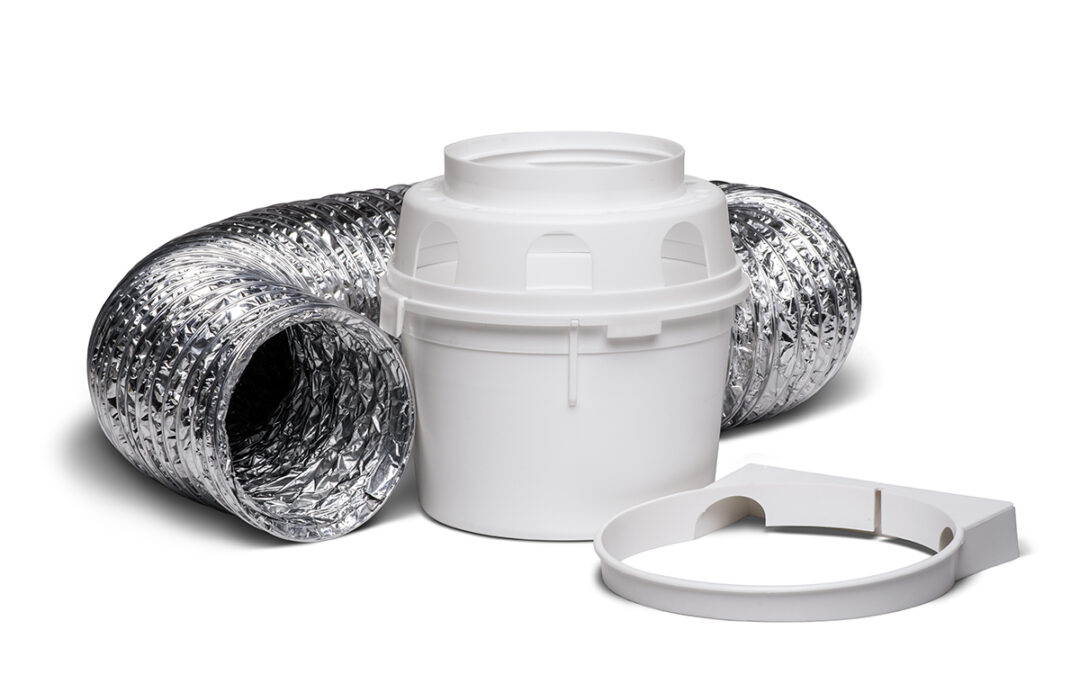
How to Install the ProFlex™ Indoor Dryer Vent Kit

How to Install the ProFlex™ Indoor Dryer Vent Kit

How to Install the ProFlex™ Indoor Dryer Vent Kit

No outside wall to vent through? It happens more than you’d think — in apartments, condos and RVs, running a duct outdoors often just isn’t an option. The ProFlex™ Indoor Dryer Vent Kit (TDIDVKZW) gives your electric dryer somewhere safe to send its hot, lint-filled air: through a short foil duct and into a water-filled lint reservoir that traps the fuzz before it reaches your room.

Here’s how to set it up, step by step — think of it as having a friend who knows HVAC standing next to you.

⚠️ Electric dryers only. This kit should NOT be used with gas clothes dryers. Gas dryers produce combustion gases, including carbon monoxide, that must be vented outdoors.

At a glance

  • Estimated time: 15–30 minutes (add 10 minutes if you’re wall-mounting the reservoir)
  • Skill level: Beginner
  • Works with: Electric clothes dryers with a standard 4″ exhaust outlet
  • Best for: Apartments, condominiums and RVs where outdoor venting isn’t possible

What you’ll need

In the box

  • 4″ × 5′ aluminum foil transition duct
  • Plastic lint reservoir (top and bottom sections) with optional mounting ring
  • Adjustable plastic clamp
  • Installation guide, use and care guide, and warranty

Tools and supplies

  • Screwdriver
  • Water (a jug or pitcher makes filling easy)
  • 2 screws, plus drywall anchors if you’re not mounting into a stud (only if wall-mounting the reservoir)
  • Stud finder (optional, for wall-mounting)
  • Flashlight
  • Vacuum with a crevice tool

Step-by-step installation


Step 1: Unplug the dryer and make room to work

Unplug the dryer from the wall outlet, then carefully slide it out far enough to reach the exhaust outlet on the back.

Why it matters: You’ll be working right beside the power cord and the back panel. Unplugging first takes the guesswork out of safety.

Tip: While the dryer is pulled out, vacuum up the lint and dust that’s collected behind and underneath it. It’s the cheapest fire prevention you’ll ever do.

Step 2: Assemble the lint reservoir

Snap the top and bottom sections of the reservoir together, lining up the guide notch so the two parts fit snugly.

Why it matters: A tight fit keeps water in and lint-filled air flowing where it should, not leaking out the seam.

Tip: If the pieces don’t want to snap together, don’t force them — rotate the top until the guide notch drops into place. When it’s lined up, it goes together easily.

Step 3: Choose a spot for the reservoir (and mount it, if you like)

Pick a location within reach of the 5′ duct, on a level surface beside or behind the dryer. Wall-mounting is optional: to mount it, fasten the mounting ring to a stud or drywall with two screws, and position the reservoir so its holes face away from the wall.

Why it matters: The reservoir’s holes are where the cleaned air leaves. Pointing them away from the wall lets that warm, moist air spread out instead of soaking into your drywall.

Tip: Mount it at a height that’s easy to reach. You’ll be emptying and refilling it after every load, so make the routine painless.

Step 4: Attach the duct to the reservoir

Insert the wire thread at one end of the foil duct into the reservoir’s threaded lid, then turn it counterclockwise until it’s secure.

Why it matters: A secure, threaded connection keeps the duct from popping off when the dryer pushes air through it.

Tip: Yes, it’s counterclockwise — the opposite of what your hands expect. If it isn’t catching, back it off and try again rather than cranking harder.

Step 5: Connect the duct to the dryer

Slide the free end of the duct over the dryer’s exhaust outlet. Wrap the adjustable plastic clamp around it and tighten until the duct can’t slip off.

Why it matters: This is the connection that takes the most heat and movement. A loose duct here dumps hot air and lint behind your dryer, which is exactly what you’re trying to avoid.

Tip: Give the duct a gentle tug after tightening the clamp. If it moves, snug the clamp a little more.

Step 6: Fill the reservoir with water

Fill the reservoir with water up to the fill line.

Why it matters: The water is what catches the lint. Without it, fine lint passes straight through and settles on everything nearby.

Tip: Don’t overfill. Water above the line can splash out when the dryer starts pushing air.

Step 7: Position the dryer and run a test load

Slide the dryer back into place, keeping the duct as short and straight as you can, with no kinks or crushed sections. Plug the dryer back in and run a short cycle while you watch the duct and reservoir.

Why it matters: Every bend and crimp slows airflow, which means longer drying times and extra heat building up in the dryer. A quick test confirms everything is sealed and flowing before you walk away.

Tip: If you have extra duct, don’t coil it up behind the dryer. Move the reservoir so the duct runs in a gentle, open curve instead.

After every load: empty and refill

When the cycle finishes, detach the bottom section of the reservoir, pour out the water and lint, and refill to the fill line before the next load.

Why it matters: Standing water full of lint gets musty fast, and a full reservoir can’t trap new lint well.

Tip: Clean the dryer’s own lint screen before every load too. Less lint coming out of the dryer means less for the reservoir to catch.

Troubleshooting


Problem

Likely cause

What to do

Clothes take longer than usual to dry

Duct is kinked, crushed or too long a run; dryer lint screen is clogged

Straighten the duct and remove sharp bends; clean the lint screen before every load

Lint or fuzz is collecting around the laundry area

Water is low or missing, or the reservoir is full of lint

Empty, rinse and refill to the fill line before each load

Water splashes or spills out of the reservoir

Overfilled past the fill line

Fill only to the line; check that the reservoir sits level

Duct slips off the dryer outlet

Clamp is loose

Re-seat the duct fully over the outlet and tighten the clamp

Duct won’t thread into the reservoir lid

Turning the wrong way or wire end isn’t seated

Line up the wire end with the threads and turn counterclockwise

Reservoir halves won’t snap together

Guide notch isn’t aligned

Rotate the top section until the notch lines up, then press together

Musty smell in the laundry area

Water was left sitting between loads

Empty and refill after every use; rinse the reservoir regularly

Room feels humid or windows fog up

Dryer air carries moisture indoors

Open a door or window, or run an exhaust fan or dehumidifier while drying

You have a gas dryer

—

Don’t use this kit. Gas dryers must vent outdoors.

Quick safety checklist

  • Electric dryers only — never gas
  • Keep the duct short, straight and uncrushed
  • Empty and refill the reservoir after every load
  • Clean the dryer’s lint screen before every load
  • Keep the area around the dryer clear of lint, boxes and laundry piles

Need a visual? Dundas Jafine’s instructional videos are on the ProFlex™ Indoor Dryer Vent Kit product page.

How to Choose Dryer Venting for New Homes

How to Choose Dryer Venting for New Homes

How to Choose Dryer Venting for New Homes

Proper clothes dryer venting is essential for safety, energy efficiency, and indoor air quality in new homes. This guide explains how to select and install dryer venting components that meet common U.S. building practices and codes.

Key considerations

  • Vent duct material: Use rigid metal ducts (galvanized steel or aluminum) or semi-rigid metal ducts. Foil or plastic ducts are fire hazards and are not recommended.
  • Diameter: Use a 4-inch (110 mm) duct for clothes dryers; ensure all components (ducts, elbows, and vent hoods) are sized for 4 inches.
  • Run length and elbows: Plan the shortest practical route with as few turns as possible. Each elbow or long run reduces airflow and increases lint buildup; consult the product charts for maximum recommended lengths.
  • Exterior vent hood: Choose a weatherproof hood with a functioning back-draft damper and insect screen. Proper sealing prevents water and pests from entering the home.
  • Vent location: Route the vent directly outside, away from doors, windows, and ventilation intakes. Avoid routing through unconditioned spaces where moisture can condense.
  • Code compliance: Follow local building codes and manufacturer installation instructions. In many areas, new homes require permits and inspections for dryer vent installations.
  • Maintenance: Clean the lint screen after every load and inspect the vent path and damper annually; schedule professional cleaning if you notice reduced airflow or excess lint buildup.

Brand options for venting components

Choose components from reputable manufacturers that offer ducting, elbows, clamps, and vent hoods compatible with 4″ systems. Examples include:

  • Dundas Jafine

Installation and safety tips

Follow the product manuals and use metal-to-metal clamps on all joints. Avoid duct tape on joints, and use approved metal foil tape to seal seams. If your run is long or complex, hire a licensed professional to ensure proper airflow and code compliance.

Safety resources

For general dryer safety guidelines, see the U.S. Consumer Product Safety Commission resources: Clothes Dryer Safety.


Ultimate Guide to Metal Dryer Boxes: Enhance Efficiency and Safety in Your Laundry Room

Ultimate Guide to Metal Dryer Boxes: Enhance Efficiency and Safety in Your Laundry Room

 Are you tired of the clutter and inefficiency that comes with traditional dryer venting? Welcome to the world of
metal dryer boxes, where safety and functionality meet to revolutionize your laundry room experience. In this
ultimate guide, we’ll explore how these ingenious solutions can enhance air flow, reduce energy costs, and
eliminate fire hazards all while maintaining a sleek aesthetic. Metal dryer boxes not only streamline your
appliance setup but also provide a durable, reliable option that stands the test of time. Whether you’re
renovating your laundry space or simply looking to upgrade your existing dryer vent system, this guide will
equip you with essential insights and tips to make informed decisions. Dive in and discover how a small change
can lead to significant improvements in both efficiency and safety, transforming your laundry room into the
efficient workspace you’ve always wanted.

Benefits of Using Metal Dryer Boxes

When it comes to upgrading your laundry room, metal dryer boxes offer numerous benefits that can
significantly enhance your overall experience. One of the primary advantages is improved airflow. Traditional
dryer vents often become clogged with lint and debris, reducing the efficiency of your dryer and increasing
drying times. Metal dryer boxes are designed to optimize airflow, ensuring that your dryer operates at peak
performance. This not only reduces energy consumption but also lowers your utility bills. Additionally, the
enhanced airflow helps to prevent overheating, which can lead to potential fire hazards.

Another significant benefit of metal dryer boxes is their durability and longevity. Made from high-quality
materials such as galvanized steel or aluminum, these boxes are built to withstand the rigors of daily use.
Unlike plastic or other less durable materials, metal dryer boxes do not warp, crack, or degrade over time. This
means you can rely on their performance for years to come, making them a cost-effective investment for your
home. Furthermore, metal dryer boxes are resistant to mold and mildew, ensuring a cleaner and healthier
laundry environment.

Aesthetically, metal dryer boxes offer a sleek and modern look that can complement any laundry room design.
Their streamlined appearance helps to reduce clutter and create a more organized space. Additionally, many
metal dryer boxes come with features such as recessed connections and hidden venting, further enhancing the
clean and tidy look of your laundry area. By choosing a metal dryer box, you not only improve the functionality
and safety of your dryer but also elevate the overall aesthetic of your laundry room.

How Metal Dryer Boxes Improve Laundry Room Safety

Safety is a paramount concern in any home, and the laundry room is no exception. One of the most significant
ways metal dryer boxes improve safety is by reducing the risk of dryer fires. According to the National Fire
Protection Association (NFPA), dryers and washing machines were involved in one out of every 22 home
structure fires reported to U.S. fire departments in 2010-2014. The leading cause of these fires was failure to
clean, primarily lint buildup in the dryer vent. Metal dryer boxes provide a secure and efficient way to manage
dryer exhaust, minimizing lint accumulation and reducing fire hazards.

In addition to preventing fires, metal dryer boxes also help to maintain proper ventilation in your laundry
room. Proper ventilation is essential for dispersing heat and moisture generated by the dryer. Without
adequate ventilation, excess moisture can lead to mold and mildew growth, which poses health risks and can
damage your home’s structure. Metal dryer boxes ensure that hot, moist air is efficiently vented outside,
maintaining a safe and healthy environment in your laundry room.

Moreover, metal dryer boxes are designed to be tamper-resistant and secure. Unlike flimsy plastic venting
systems that can be easily damaged or dislodged, metal dryer boxes provide a robust and stable connection
between your dryer and the venting system. This ensures that exhaust gases are safely directed outside,
preventing the potential buildup of harmful fumes such as carbon monoxide. By choosing a metal dryer box,
you can have peace of mind knowing that your laundry room is equipped with a safe and reliable venting
solution.

Key Features to Look for in Metal Dryer Boxes

When selecting a metal dryer box, there are several key features to consider to ensure you choose the best
option for your needs. One important feature is the material used in construction. High-quality metal dryer
boxes are typically made from galvanized steel or aluminum, both of which offer excellent durability and
resistance to corrosion. Galvanized steel is particularly robust and can withstand high temperatures, while
aluminum is lightweight and easy to install. Choose a material that best suits your specific requirements and
preferences.

Another crucial feature to look for is the design of the dryer box. Recessed or semi-recessed designs are highly
recommended as they save space and provide a more streamlined appearance. These designs allow the dryer to
sit closer to the wall, reducing the overall footprint of the appliance and creating a more organized laundry
room. Additionally, look for boxes with smooth interior surfaces, as these reduce lint buildup and facilitate
easier cleaning.

Ease of installation is another important consideration. Look for metal dryer boxes that come with clear
instructions and all necessary mounting hardware. Some models feature pre-drilled holes and adjustable
brackets, making the installation process more straightforward. Additionally, consider whether the dryer box is
compatible with your specific dryer model and venting system. Many manufacturers offer universal designs
that can accommodate a wide range of dryers and vent configurations. By choosing a metal dryer box with
these key features, you can ensure a smooth and hassle-free installation process.

Installation Guide for Metal Dryer Boxes

Installing a metal dryer box may seem daunting, but with the right tools and instructions, it can be a
straightforward process. Begin by gathering the necessary tools and materials, including a metal dryer box, a
measuring tape, a pencil, a drill, screws, a screwdriver, and duct tape. Make sure to read the manufacturer’s
instructions carefully before starting the installation to ensure you understand the specific steps and
requirements for your dryer box model.

Start by measuring and marking the location where the dryer box will be installed. It is essential to position the
box at the correct height and distance from the dryer to ensure proper alignment and connection. Use a stud
finder to locate and mark the wall studs, as these will provide the necessary support for mounting the dryer
box. Once you have marked the location, use a drill to create pilot holes for the screws. This will make it easier
to secure the dryer box to the wall.

Maintenance Tips for Metal Dryer Boxes

Proper maintenance is essential to ensure the longevity and efficiency of your metal dryer box. One of the most
critical maintenance tasks is regular cleaning. Over time, lint and debris can accumulate inside the dryer box
and vent hose, reducing airflow and increasing the risk of fire. To clean your metal dryer box, start by
unplugging the dryer and disconnecting the vent hose. Use a vacuum cleaner with a hose attachment to remove
any lint and debris from the dryer box and vent hose. For more thorough cleaning, you can use a dryer vent
cleaning kit, which typically includes brushes and flexible rods to reach deep into the venting system.
In addition to regular cleaning, it is essential to inspect your metal dryer box and venting system for any signs
of damage or wear. Check for cracks, holes, or loose connections that could compromise the efficiency and
safety of your dryer. If you notice any issues, repair or replace the damaged components as needed. It is also a
good idea to periodically check the exterior vent cover to ensure it is free of obstructions and functioning
correctly. A properly functioning vent cover will prevent pests and debris from entering the venting system
while allowing exhaust air to escape freely.

Finally, make sure to follow the manufacturer’s recommendations for maintenance and care. Some metal dryer
boxes may require specific cleaning products or techniques to maintain their performance and appearance. By
staying on top of regular maintenance tasks and addressing any issues promptly, you can ensure that your
metal dryer box continues to provide efficient and safe operation for years to come.

Comparing Metal Dryer Boxes to Other Materials

Another material option is flexible foil or vinyl venting systems. These materials are often used for temporary
or short-term solutions due to their low cost and ease of installation. However, they are not recommended for
long-term use. Flexible foil and vinyl vents are prone to kinking and crushing, which can restrict airflow and
increase drying times. They are also more likely to accumulate lint and debris, increasing the risk of fire. In
contrast, metal dryer boxes provide a stable and secure connection that ensures efficient airflow and reduces
fire hazards.

In terms of aesthetics, metal dryer boxes offer a more polished and professional look compared to plastic or
flexible venting options. The sleek, modern design of metal dryer boxes can enhance the overall appearance of
your laundry room, creating a more organized and visually appealing space. Additionally, metal dryer boxes
are available in various finishes and styles, allowing you to choose a design that complements your laundry
room decor. Overall, metal dryer boxes provide superior durability, safety, and aesthetics compared to other
materials, making them an excellent choice for any laundry room.

Common Misconceptions About Metal Dryer Boxes

There are several common misconceptions about metal dryer boxes that can deter homeowners from choosing
this option for their laundry rooms. One misconception is that metal dryer boxes are difficult to install. While
the installation process may seem intimidating, it is relatively straightforward with the right tools and
instructions. Many metal dryer boxes come with clear installation guides and all necessary mounting
hardware, making the process more manageable for homeowners.

Another misconception is that metal dryer boxes are expensive. While it is true that metal dryer boxes may
have a higher upfront cost compared to plastic or flexible venting options, they offer significant long-term
savings. The durability and efficiency of metal dryer boxes mean that you will spend less on repairs and
replacements over time. Additionally, the improved airflow provided by metal dryer boxes can reduce energy
consumption and lower utility bills, further offsetting the initial investment.

Some homeowners may also believe that metal dryer boxes are prone to rust and corrosion. However,
high-quality metal dryer boxes are typically made from galvanized steel or aluminum, both of which are
resistant to rust and corrosion. Proper maintenance, such as regular cleaning and inspection, can further
ensure the longevity and performance of your metal dryer box. By addressing these misconceptions, you can
make a more informed decision and choose the best dryer venting solution for your home.

Customer Reviews and Testimonials

Hearing from other homeowners who have installed metal dryer boxes can provide valuable insights and help
you make an informed decision. Many customers rave about the improved efficiency and safety provided by
metal dryer boxes. One satisfied customer noted that their drying times were significantly reduced after
installing a metal dryer box, leading to lower energy bills and a more efficient laundry routine. Another
customer highlighted the peace of mind they gained from knowing their dryer venting system was safe and
secure, reducing the risk of fire.

In addition to improved performance, customers also appreciate the durability and longevity of metal dryer
boxes. One reviewer shared that their metal dryer box had remained in excellent condition for over a decade,
withstanding daily use and exposure to high temperatures without any signs of wear or damage. Another
customer praised the sleek and modern design of their metal dryer box, which enhanced the overall
appearance of their laundry room and created a more organized space.

Overall, customer reviews and testimonials highlight the numerous benefits of metal dryer boxes, including
improved efficiency, safety, durability, and aesthetics. By choosing a metal dryer box, you can join the ranks of
satisfied homeowners who have transformed their laundry rooms into efficient and safe spaces.

Conclusion: Making the Right Choice for Your Laundry Room

In conclusion, metal dryer boxes offer a range of benefits that can significantly enhance the efficiency and
safety of your laundry room. From improved airflow and reduced energy consumption to increased durability
and a sleek aesthetic, metal dryer boxes provide a superior solution compared to other materials. By investing
in a high-quality metal dryer box, you can enjoy a more organized, efficient, and safe laundry room for years to
come.

When selecting a metal dryer box, consider key features such as material, design, and ease of installation to
ensure you choose the best option for your needs. Follow proper installation and maintenance guidelines to
maximize the performance and longevity of your dryer box. By addressing common misconceptions and
learning from customer reviews and testimonials, you can make an informed decision and confidently upgrade
your dryer venting system.

Ultimately, choosing a metal dryer box is a smart investment that can transform your laundry room
experience. With improved efficiency, reduced fire hazards, and a more organized space, you can enjoy a safer
and more functional laundry routine. So, take the plunge and discover how a small change can lead to
significant improvements in your home.

The Evolution of Dryer Venting: Why UL-Approved Ducts Are Essential

The Evolution of Dryer Venting: Why UL-Approved Ducts Are Essential

For decades, vinyl ducting was the go-to solution for venting clothes dryers. However, as technology advanced, manufacturers developed safer and more efficient alternatives. One of the most significant improvements came with the introduction of aluminum foil ducts, which offered better heat and flame resistance—especially those with a polyester-lined core.

A Game-Changer in Dryer Venting Safety

In the last ten years, a major breakthrough transformed the industry: Underwriters Laboratories (UL) introduced Standard 2158A for Clothes Dryer Transition Duct. This was a revolutionary step because, for the first time, a flexible duct was approved for use with both gas and electric dryers. While rigid and semi-rigid ducts had long been recommended by manufacturers, UL 2158A opened the door for a more consumer-friendly, flexible option without compromising safety.

The Hidden Danger of Non-Approved Dryer Vents

The UL-approved transition duct was designed to address a growing and serious problem: dryer fires. Many homeowners unknowingly use non-UL-approved venting products, putting their homes at risk. Vinyl ducting, in particular, is no longer recommended for dryer venting due to its flammability and safety hazards.

What Should You Use Instead?

If rigid aluminum pipe isn’t an option for your setup, the only safe alternative is a fully UL 2158A-approved flexible transition duct, such as the Dundas Jafine ProFlex™ series.

Buyer Beware: Always Check for the UL Mark

Not all dryer venting products are created equal. If it doesn’t have the UL mark, it’s not UL-approved! Always verify before purchasing to ensure your home’s safety.

Upgrading to an approved dryer venting system is a small change that can prevent a devastating fire. Make the switch today for safer, more efficient drying.