
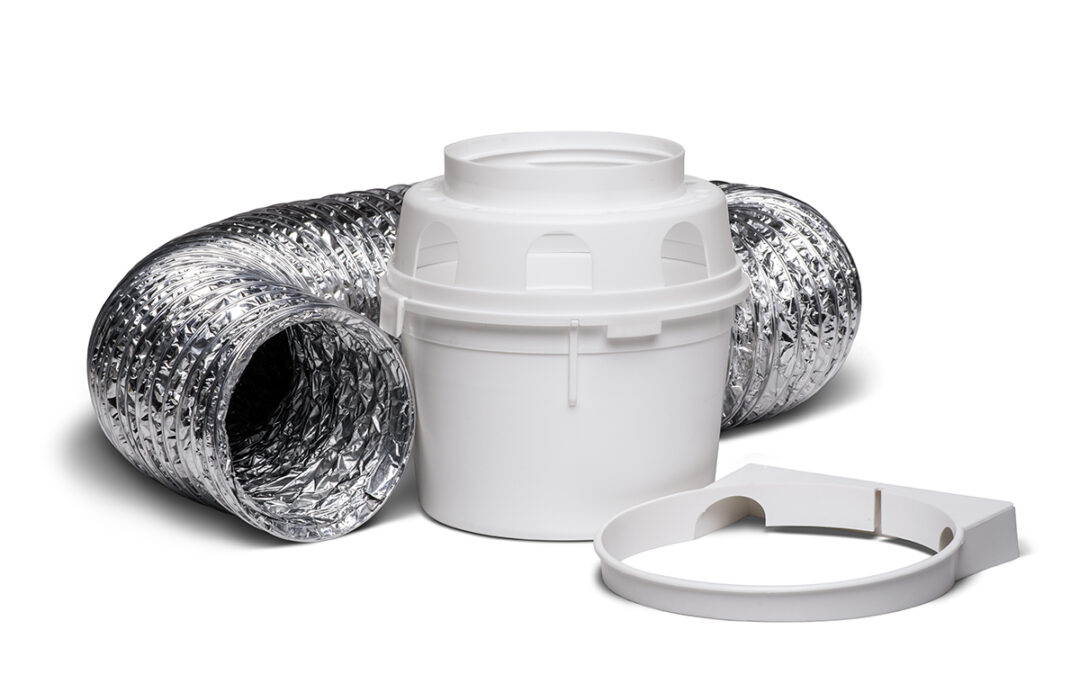
How to Install the ProFlex™ Indoor Dryer Vent Kit
No outside wall to vent through? It happens more than you’d think — in apartments, condos and RVs, running a duct outdoors often just isn’t an option. The ProFlex™ Indoor Dryer Vent Kit (TDIDVKZW) gives your electric dryer somewhere safe to send its hot, lint-filled air: through a short foil duct and into a water-filled lint reservoir that traps the fuzz before it reaches your room.
Here’s how to set it up, step by step — think of it as having a friend who knows HVAC standing next to you.
⚠️ Electric dryers only. This kit should NOT be used with gas clothes dryers. Gas dryers produce combustion gases, including carbon monoxide, that must be vented outdoors.
At a glance
- Estimated time: 15–30 minutes (add 10 minutes if you’re wall-mounting the reservoir)
- Skill level: Beginner
- Works with: Electric clothes dryers with a standard 4″ exhaust outlet
- Best for: Apartments, condominiums and RVs where outdoor venting isn’t possible
What you’ll need
In the box
- 4″ × 5′ aluminum foil transition duct
- Plastic lint reservoir (top and bottom sections) with optional mounting ring
- Adjustable plastic clamp
- Installation guide, use and care guide, and warranty
Tools and supplies
- Screwdriver
- Water (a jug or pitcher makes filling easy)
- 2 screws, plus drywall anchors if you’re not mounting into a stud (only if wall-mounting the reservoir)
- Stud finder (optional, for wall-mounting)
- Flashlight
- Vacuum with a crevice tool
Step-by-step installation
Step 1: Unplug the dryer and make room to work
Unplug the dryer from the wall outlet, then carefully slide it out far enough to reach the exhaust outlet on the back.
Why it matters: You’ll be working right beside the power cord and the back panel. Unplugging first takes the guesswork out of safety.
Tip: While the dryer is pulled out, vacuum up the lint and dust that’s collected behind and underneath it. It’s the cheapest fire prevention you’ll ever do.
Step 2: Assemble the lint reservoir
Snap the top and bottom sections of the reservoir together, lining up the guide notch so the two parts fit snugly.
Why it matters: A tight fit keeps water in and lint-filled air flowing where it should, not leaking out the seam.
Tip: If the pieces don’t want to snap together, don’t force them — rotate the top until the guide notch drops into place. When it’s lined up, it goes together easily.
Step 3: Choose a spot for the reservoir (and mount it, if you like)
Pick a location within reach of the 5′ duct, on a level surface beside or behind the dryer. Wall-mounting is optional: to mount it, fasten the mounting ring to a stud or drywall with two screws, and position the reservoir so its holes face away from the wall.
Why it matters: The reservoir’s holes are where the cleaned air leaves. Pointing them away from the wall lets that warm, moist air spread out instead of soaking into your drywall.
Tip: Mount it at a height that’s easy to reach. You’ll be emptying and refilling it after every load, so make the routine painless.
Step 4: Attach the duct to the reservoir
Insert the wire thread at one end of the foil duct into the reservoir’s threaded lid, then turn it counterclockwise until it’s secure.
Why it matters: A secure, threaded connection keeps the duct from popping off when the dryer pushes air through it.
Tip: Yes, it’s counterclockwise — the opposite of what your hands expect. If it isn’t catching, back it off and try again rather than cranking harder.
Step 5: Connect the duct to the dryer
Slide the free end of the duct over the dryer’s exhaust outlet. Wrap the adjustable plastic clamp around it and tighten until the duct can’t slip off.
Why it matters: This is the connection that takes the most heat and movement. A loose duct here dumps hot air and lint behind your dryer, which is exactly what you’re trying to avoid.
Tip: Give the duct a gentle tug after tightening the clamp. If it moves, snug the clamp a little more.
Step 6: Fill the reservoir with water
Fill the reservoir with water up to the fill line.
Why it matters: The water is what catches the lint. Without it, fine lint passes straight through and settles on everything nearby.
Tip: Don’t overfill. Water above the line can splash out when the dryer starts pushing air.
Step 7: Position the dryer and run a test load
Slide the dryer back into place, keeping the duct as short and straight as you can, with no kinks or crushed sections. Plug the dryer back in and run a short cycle while you watch the duct and reservoir.
Why it matters: Every bend and crimp slows airflow, which means longer drying times and extra heat building up in the dryer. A quick test confirms everything is sealed and flowing before you walk away.
Tip: If you have extra duct, don’t coil it up behind the dryer. Move the reservoir so the duct runs in a gentle, open curve instead.
After every load: empty and refill
When the cycle finishes, detach the bottom section of the reservoir, pour out the water and lint, and refill to the fill line before the next load.
Why it matters: Standing water full of lint gets musty fast, and a full reservoir can’t trap new lint well.
Tip: Clean the dryer’s own lint screen before every load too. Less lint coming out of the dryer means less for the reservoir to catch.
Troubleshooting
|
Problem |
Likely cause |
What to do |
|---|---|---|
|
Clothes take longer than usual to dry |
Duct is kinked, crushed or too long a run; dryer lint screen is clogged |
Straighten the duct and remove sharp bends; clean the lint screen before every load |
|
Lint or fuzz is collecting around the laundry area |
Water is low or missing, or the reservoir is full of lint |
Empty, rinse and refill to the fill line before each load |
|
Water splashes or spills out of the reservoir |
Overfilled past the fill line |
Fill only to the line; check that the reservoir sits level |
|
Duct slips off the dryer outlet |
Clamp is loose |
Re-seat the duct fully over the outlet and tighten the clamp |
|
Duct won’t thread into the reservoir lid |
Turning the wrong way or wire end isn’t seated |
Line up the wire end with the threads and turn counterclockwise |
|
Reservoir halves won’t snap together |
Guide notch isn’t aligned |
Rotate the top section until the notch lines up, then press together |
|
Musty smell in the laundry area |
Water was left sitting between loads |
Empty and refill after every use; rinse the reservoir regularly |
|
Room feels humid or windows fog up |
Dryer air carries moisture indoors |
Open a door or window, or run an exhaust fan or dehumidifier while drying |
|
You have a gas dryer |
— |
Don’t use this kit. Gas dryers must vent outdoors. |
Quick safety checklist
- Electric dryers only — never gas
- Keep the duct short, straight and uncrushed
- Empty and refill the reservoir after every load
- Clean the dryer’s lint screen before every load
- Keep the area around the dryer clear of lint, boxes and laundry piles
Need a visual? Dundas Jafine’s instructional videos are on the ProFlex™ Indoor Dryer Vent Kit product page.
